
.jpg)
.jpg)
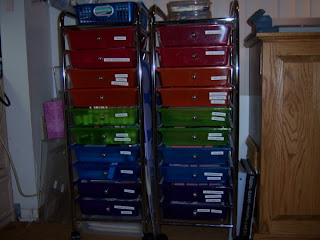
This is my stack of drawers that hold all of the smaller things like glitter, embossing powders and brads. I also store my tags, fibers and paints here. The one to the left goes all the way to the ceiling. but I'm about to change that. I'll post when I change it.
.jpg)
This is one of my cabinets. It holds most of my unmounted stamps. I have my Carl cutter and Cuttlebug on the top surface.
.jpg)
.jpg)
These are the drawers that hold my unmounted stamps. I have them in categories that work for me. They are all on EZ mount foam and stored on the lightweight binder sheets from Sunday International. It;s the best system out there. The top drawer on the left holds mounts and the two top drawers on the right hold clear sets. There are notebooks along the side of the drawers that contain stamped images of each stamp by category and sheet. As you can see everything in my stamp room is labeled. I bought a label maker years ago and can't live without it.
.jpg)
This is the inside of my drawer that contains my images from Posh Impressions. This set came on EZ mount and was pre-labeled. I only have a few like that, but they sure are easy to pick out.
.jpg)
.jpg) This is my stamping desk. It's a computer hutch. It is set into half of a closet. It fit perfectly. There are shelves my husband built to the right of the desk and wire closet shelves to the left. It looks really messy in the picture, but it isn't. I have a cork board on the back of the desk. There is a slide out computer keyboard drawer that holds many things. It has my Score-It, cutting mats and tidy tray. It's really handy to reach down.
This is my stamping desk. It's a computer hutch. It is set into half of a closet. It fit perfectly. There are shelves my husband built to the right of the desk and wire closet shelves to the left. It looks really messy in the picture, but it isn't. I have a cork board on the back of the desk. There is a slide out computer keyboard drawer that holds many things. It has my Score-It, cutting mats and tidy tray. It's really handy to reach down.
.jpg) This is the shelves to the right. The top one holds a stamp pad rack from the same store that I got my paper racks at. It holds my most used ink pads. there are some of those Mustangs I mentioned earlier. They are ALL over! LOL!
This is the shelves to the right. The top one holds a stamp pad rack from the same store that I got my paper racks at. It holds my most used ink pads. there are some of those Mustangs I mentioned earlier. They are ALL over! LOL!.jpg) This is the top of my hutch. It contains two handmade ink pad holders. They are made out of foam core & hot glue. My husband & I made them. Pretty cool huh? I found wonderful directions for how to make these on a blog. I also made a little version out of black foam core and it holds most of my markers.
This is the top of my hutch. It contains two handmade ink pad holders. They are made out of foam core & hot glue. My husband & I made them. Pretty cool huh? I found wonderful directions for how to make these on a blog. I also made a little version out of black foam core and it holds most of my markers..jpg)
This is the wire shelves to the left of my stamp table. It holds things that I want to be able to reach over to grab when I'm working on a project. It has papers, stamp cleaning pads, markers and adhesives to name a few things. It connects over to the other half of the closet that I don't use for stamping.

.jpg)
.jpg)
.jpg)
.jpg)
.jpg)
.jpg)
.jpg)
.jpg) Now add in some Ocean Wave and Ruby Red.
Now add in some Ocean Wave and Ruby Red. .jpg) Lastly, add some
Lastly, add some .jpg)
.jpg)
 You'll start by working on a non-stick craft sheet from Ranger. Apply your first color of alcohol ink to the felt attached to your ink tool. I just press the tip of the ink bottle into the felt.
 .jpg) I like to work with a mix of three colors. I chose to work with butterscotch, cranberry & stream. Then I added a very small drop of the gold metallic mixative. Then you'll tap the felt onto your glossy paper. This is the first tapping.
I like to work with a mix of three colors. I chose to work with butterscotch, cranberry & stream. Then I added a very small drop of the gold metallic mixative. Then you'll tap the felt onto your glossy paper. This is the first tapping..jpg)
.jpg)
.jpg)
.jpg) Stamp your image with Graphite black Brilliance ink. You may want to heat set the image or you can let it dry overnight.
Stamp your image with Graphite black Brilliance ink. You may want to heat set the image or you can let it dry overnight. .jpg)


