
As you can tell, I'm still fixated on Valentine Cards. I did another Valentine in reds. I used the Hero Arts birds becasue they are so dang cute. I submitted it to the Hero Arts Blog weekly challenge. It was lots of fun to create, but it didn't photograph too well. It's an acetate card & had a glare no matter what we tried.
.jpg)
.jpg)
.jpg)
.jpg)
I first stamped the Posh Impressions background stamp onto the acetate card with Cherry Red Staz-On ink. I stamped the birds from Hero Arts onto watercolor paper with Onyx Black Versafine Ink. I colored the birds with red & pink twinkling H2O's with a water brush. Once they were dry, I cut them out with detail scissors. I used my Oval Nestabilities to cut the top layers and the Long Rectangle Nestabilities to cust the bottom layers. I used my Cuttlebug machine. The pink layers were aged with the Staz-On inkpad. I stamped the top layers with a Hero Arts texture stamp and the Greeting is also from Hero Arts. I attached the birds with foam tape. The tiny Hearts are from K & Company & I found them at Wal-Mart for $1.50. That was for an entire sheet. The Nestability shapes are mirrored throughout the card so the received can't see the adhesive. So, there are four ovals on the cards & four rectangles throughout the card.
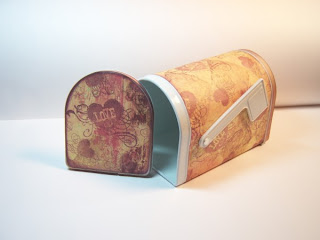
I also started a valentine mailbox. These little mailboxes are a really great way to give gifts. I've seen all kinds of them on blogs. They make grat goodie "bags" and a great way to deliver sweets or cookies. My oldest son just wants to make one with me to hold his skateboarding stickers! LOL! He selected a silver mailbox for his project. I'm sure I'll add it to this blog. The mailboxes were $1 in the Target dollar spot. I got some in red, white & silver. There are also some metallic pink ones out there.
The mailbox was pretty easy to cover. I took a piece of computer paper and cut it to fit between the edges of the mailbox. When I wrapped it around the mailbox the screw from the flag made an imprint onto the paper with a light rubbing of my fingers. I punched a standard size hole where the screw was and cut a small slit from the hole to the short side of the paper. I attached double stick adhesive around the mailbox and wiggled the paper into place around the flag hole. I pulled the release paper off of the adhesive once the paper was in place. I cut templates of the ends. The paper is a decorative paper from Sandy Lions. I got it years ago and have been holding onto it for the perfect project. I stamped the hearts (Inkadinkado-Clear $1 stamps from JoAnns) all over the decorative paper with Pearlescent Crimson Brilliance ink before I attached it to the mailbox. I attached ribbon to the side of the mailbox ends with double stick tape. The ribbon is tan & I ran my Brilliance inkpad over it for color. I plan to add more to it, but I son't have an exact plan yet. I know I'll do something to the flag. I will post it next week when I finish it.
Now for the Row Houses. These little works of art are tons of fun. I found out about them on a Club Posh Challenge. They're a really simple idea that has endless possibilities. You make them to add them to cards or other pieces of art. They're about the size of a trading card with a peak for the roof. You're supposed to name you row houses when they are completed. Mine is called
"House of Purple". I know, not very origional, but I couldn't come up with a better name becasue I'm not sure what the flower it is. I thought maybe a Dogwood, but I have no real idea. The stamps are from Posh Impressions, Stamp Cabana & The Artful Stamper. I'll plan to tell you all how the background was made in the future. It's basically a collage.
Until next time, JIL


No comments:
Post a Comment