Monday, September 28, 2009

Using more scraps...

4:36 PM
I've ben busy using up my scraps. Like I said before, I have tons of them & will be using them for quite a long time. I seem to have a ton of strips that are about 2" wide. Many of them are really nice papers with shimmer in them. They're a really odd size to use & I can only make so many scraplings before I get bored.

This card is a different type of scrap. I am really into trying new techniques, but I often fail to follow through and turn the images into cards. I'm trying to get better about that. I found a box full of scraps and really nice, but unused images. I used one of them on this card.


This is a close up of the image. The angel stamp is from Stampers Anonymous. The main image is layers of Powder Keg embossing powders. I'm sure I made her in a class I taught.

This is the full view of the card. The side pannels are Powder Keg embossing Powders on a retired Stampa Rosa image. The purple piece behind the angel is the Celtic Knot Cuttlebug embossing folder. I found the design for this card on Splitcoaststampers. It's really easy to put together. I just love all the idea I get from that group of talented ladies.

Wednesday, September 23, 2009

10:34 AM
I have been on a mission to use my pre-cut cards and scraps. I'm doing pretty good. All of the cards I'm posting lately have included not cuts from a whole sheet of paper. I've used just scraps. I have a lot of scraps so I plan to keep using them until I've used them up.
I'm still going crazy stamping & lovin it! I'll post a few cards today. I have several more to post, but I keep forgetting to add them to my blog. Here are a few.
This is scrapling I made for a challenge at Club Posh. They are fun! It is a folded mini card that is 1 1/2" x 4". Thestamps are all from the Hero Arts Clear set called Christmas owls. The Layer is polished stone stamped with the snowflakes in Mediteranean Blue & Starlight Silver Brilliance ink. The Owl was colored with Prismacolor colored pencils & OMS (Odorless mineral spirits) with blending stumps.

This is a card I made with the scrapling. I use a Stampin Up punch to make a slit so the scrapling card front can be opened to reveal a message.
I made this Halloween card for the boys. They asked me to make them cards with the pop-up tree (below) and I couldn't refuse them. The front is really simple. I used my Cuttlebug folders from last year. I embossed them onto black scraps & rubbed the Starlight Silver Brillance inkpad over the raised areas.


This is the pop-up tree on the inside of the card. It's really hard to photograph because the tree skirt is foil. It made it really hard for me to get a good picture of the tree. The little foil bats & skulls on the tree. The tree is stamped with an Anna Griffin background with Starlight Silver Brilliance ink & embossed with glow in the dark embossing powder. I think the boys will really like them!

Tuesday, September 15, 2009

Blogging Again

1:48 AM
I am a bad blogger. I know this! I've been quite sick for several months now & just haven't had the energy to stamp while I've been home. The other day, my great friend Char told me I need to start blogging again. So, here I am! I've been really inspired to create this last week. It's a combination of two things. I'm no longer on any pain killers & I started to play with the many new tools, embelishments and stamps Char got me for Christmas & my birthday. She sent me a huge box & it arrived right after I got out of the hospital for the first time. I was so out of it I didn't get a chance to really enjoy what I received. Now, I am enjoying all of the goodies she sent. I've been making cards and boxes like crazy. One of the things she sent me is the Crafters Companion Ultimate Tool. This thing is cool. I'vs used it to make boxes, tri-shutter cards, gate-fold cards, K Cards, explosion cards & I'm just getting started. Over the next few days I plan to post my most recient cards & boxes. I also have some pictures of cards I made right before I got sick & didn't manage to show here. I'll probably post them with just descriptions so I have time to keep stamping.

This is a box I made with the Ultimate tool. It opens like a pizza box. The main image is stamped in Onyx Black Versafine with a stamp from the Hero Arts set Together. I colored it with Prismacolor colored Pencils. It is layered onto a scrap of dark brown paper & then onto a piece of copper paper that was stamped with Coffee Bean Brilliance ink using the dots & flowers background from Hero Arts. It is on top of a teal shape cut with my Cuttlebug & Scallop Rectangle Nestabilities. The box is stamped with the swirls in the Hero Arts Valentine Flourish Clear set. I used StazOn Opaque ink in the color Butter Cream.

I forgot to mention that I won a $100 shopping spree on the Hero Arts Blog! All I did was post to the blog. Each month they pick one random post & award that person a shopping spree. How awesome is that? All of the stamps I used above are part of my winnings.

Thursday, February 26, 2009

I'm Copic Certified!

12:54 AM
I don't have any pictures to post yet, but I had to share with anyone that is reading this. I went to Pensacola this last weekend, and got Copic Certified. It was a great weekend. We stayed there Sunday night. My clas was all day monday. I learned everything I need to know about Copics. Ieven learned how to use them to color! For those of you that know, I really stink with them. Now, I've figured it out! it only took a six hour class and fifteen hours in the car, but I've figured them out. We used the airbrush system and now Iwant one. I was soooo happy to met several prominate stampers. I had a great time & just had to share. I've done some images from the class samples. I've even finished a cute card. I'll have to upload it soon. I'm just so darn happy to finaly be able to use my Copic markers! JIL

Monday, February 9, 2009

I'm thinking about Spring with flowers

12:43 AM
As you can see, I'm ready for spring. I made three spring cards. Two of them are for Club Posh challenges and one is an old favorite that I made for a friend at work.
My friend Kathy lost her grandmother last week, so I had to make her an over-the-top card. This card has to be one of my favorite cards. Years ago I took a class with Marilyn Parke from the stamp company Parked on Rubber. I have been making this card for special occassions forever. It's such an elegant card and I wish I designed it myself! Kathy loved this card so much, she had her husband frame it for her. That was a huge compliment. The funny thing is, I didn't intentionally sign up to take the class. I thought I was signing up for a class on Magic Colored Pencils with Debbie Gunyon. I was dissapointed about the mistake for about two seconds. I'm sure I would have loved the class with Debbie, but I have since had chances to see her demonstrate her awesome technique.

The stamps are from Parked on Rubber & Me & Carrie Lou. I'm not sure what stamps are from each company, sorry. They are stamped with Glitter Gold Embossing Powder and embossed on vellum. The vase design is actually a blank vase that was stamped with a floral egg stamp. The images are colored with Tombo Markers on the front of the vellum. All images were cut out right next the embossing and layered into the vase. The centers of the flowers were accented with Swarvoski crystals that were applied with a toothpick and crystal lacquer.
My next card was inspired by Becca on her blog, Amazing Paper Grace. She did a video of her medallion technique on her blog and you can find it on the right hand side of her links. Here is her blog http://www.amazingpapergrace.com/ It is so wonderful what combinations she has come up with for her layers. I did this card for a Club Posh Challenge to create a weather themed card while uing a new tool with my favorite adhesive and my favorite punch. Here it is:

This card was made using her medallion technique straight off her video with an EK Success punch. Please check it out. I will warn you that her techique is addictive! LOL! My main image is the tree from an Inkadinkado Clear set. The flower is also from another clear set. The tree is stamped on a circle of watercolor paper with Onyx Versafine ink. It is the largest plain nestabilities circle. I colored it with a light wash of Twinkling H2O's. The flowers were stamped on the watercolor paper scraps with the Onyx ink & colored with H2O's. The card came together really quick. The papers are a 12"x12" stack that I picked up at JoAnns. I didn't keep the cover page, but I saw it there last weekend. I used foam tape to add the flowers & the medallion. I added three sizes of flat backed pearls to accent the card.


The last card was another Club Posh Challenge. I did it before a challenge was declared, but it was posted as a challenge today. It was posted as a technique that I had seen before, but hadn't tried. So, of course I had to finally try it. The technique is called thumping. It's really a fun, loose technique. I inked up my stamp with an Aqua Vivid inkpad. Then I took a blue Marvy Brushart marker and thumped it onto my stamp. I just tapped it all over the image. I did the same technique with two Posh Impressions stamps. I first did the oriental writing background and stamped it onto white glossy paper. Then I inked up the cherry blossom stamp and stamped it over top of the background. It is layere over two colors of paper that were punched with my new Martha Stewart Boarder punch. The word is stamped with Dark Blue Brilliance Ink. I was going for the textured look or I would have embossed it on that textured paper.
I'm still working out how to properly photograph my images. It's a work in progress. I'm loving working with my textured papers. It's my goal to use up my older papers before I use them, but I keep reaching for those textures. I am using some of my older papers as I go , so I guess I'm doing pretty good. Until next time, JIL

Monday, January 26, 2009

Another Valentine & A Row House

11:43 PM
As you can tell, I'm still fixated on Valentine Cards. I did another Valentine in reds. I used the Hero Arts birds becasue they are so dang cute. I submitted it to the Hero Arts Blog weekly challenge. It was lots of fun to create, but it didn't photograph too well. It's an acetate card & had a glare no matter what we tried.
I first stamped the Posh Impressions background stamp onto the acetate card with Cherry Red Staz-On ink. I stamped the birds from Hero Arts onto watercolor paper with Onyx Black Versafine Ink. I colored the birds with red & pink twinkling H2O's with a water brush. Once they were dry, I cut them out with detail scissors. I used my Oval Nestabilities to cut the top layers and the Long Rectangle Nestabilities to cust the bottom layers. I used my Cuttlebug machine. The pink layers were aged with the Staz-On inkpad. I stamped the top layers with a Hero Arts texture stamp and the Greeting is also from Hero Arts. I attached the birds with foam tape. The tiny Hearts are from K & Company & I found them at Wal-Mart for $1.50. That was for an entire sheet. The Nestability shapes are mirrored throughout the card so the received can't see the adhesive. So, there are four ovals on the cards & four rectangles throughout the card.


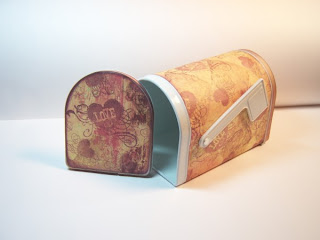
I also started a valentine mailbox. These little mailboxes are a really great way to give gifts. I've seen all kinds of them on blogs. They make grat goodie "bags" and a great way to deliver sweets or cookies. My oldest son just wants to make one with me to hold his skateboarding stickers! LOL! He selected a silver mailbox for his project. I'm sure I'll add it to this blog. The mailboxes were $1 in the Target dollar spot. I got some in red, white & silver. There are also some metallic pink ones out there.
The mailbox was pretty easy to cover. I took a piece of computer paper and cut it to fit between the edges of the mailbox. When I wrapped it around the mailbox the screw from the flag made an imprint onto the paper with a light rubbing of my fingers. I punched a standard size hole where the screw was and cut a small slit from the hole to the short side of the paper. I attached double stick adhesive around the mailbox and wiggled the paper into place around the flag hole. I pulled the release paper off of the adhesive once the paper was in place. I cut templates of the ends. The paper is a decorative paper from Sandy Lions. I got it years ago and have been holding onto it for the perfect project. I stamped the hearts (Inkadinkado-Clear $1 stamps from JoAnns) all over the decorative paper with Pearlescent Crimson Brilliance ink before I attached it to the mailbox. I attached ribbon to the side of the mailbox ends with double stick tape. The ribbon is tan & I ran my Brilliance inkpad over it for color. I plan to add more to it, but I son't have an exact plan yet. I know I'll do something to the flag. I will post it next week when I finish it.


Now for the Row Houses. These little works of art are tons of fun. I found out about them on a Club Posh Challenge. They're a really simple idea that has endless possibilities. You make them to add them to cards or other pieces of art. They're about the size of a trading card with a peak for the roof. You're supposed to name you row houses when they are completed. Mine is called
"House of Purple". I know, not very origional, but I couldn't come up with a better name becasue I'm not sure what the flower it is. I thought maybe a Dogwood, but I have no real idea. The stamps are from Posh Impressions, Stamp Cabana & The Artful Stamper. I'll plan to tell you all how the background was made in the future. It's basically a collage.
Until next time, JIL

Monday, January 19, 2009

I'm Back

4:39 AM
I know, it's been months since I posted, but I hope to change that. I plan to post cards with recipes and an occasional tutorial. I started a new job is August & have been on the fast track ever since. It's been a bit of an adjustment for me, but I am finally ready to blog again. I only find time to stamp on my work weekends, Sunday & Monday so don't expect too much from me. Here is one of my Valentines day cards. I plan to make at least one other design & maybe even two, but here are my first cards.


The House Mouse image was stamper with Versafine Onyx Blace ink & then colored with Copic Markers. The circles are the Nestabilities, Small Circles and Large Petite Scalloped Circles (confusing huh? The Large refers to the set of circles and petite is referring to the size of the scallop.) The pink paper was embossed with the Argyle Cuttlebug Folder. I used the large scaloped rectangles under that. I punched the corners of the brown layer with the ticket punch from Stampin Up. Those are dew drops in the corners. I use pearl dew drops and put a drop of Tim Holtz alcohol ink on each dew drop to make a custom color. I edged my layers with a Silver Pilot Paint Pen. The white dots on the scallops are a Signo pen. Many of the layers were accented in brown with the Chocolate brown Brilliance Inkpad.


Now, for another variation. I used many of the same elements. I changed up the colors and a few elements to make a card for the Club Posh Challenge. It's a great challenge to make a valentines card with a heart on it, but you can't use any shade of red! So I did up this card. I added in the Posh Impressions background.

Hope you enjoyed the two variations of this Valentine's Day card. I'll post again soon. JIL